 Have you ever tried to typeset any kind of math and driven yourself almost mad? And have you ended up setting each part of the equation in a different type frame, then piecing it all together and grouping it? I confess that I have done both. But with a little perseverance I figured out a way to do it properly in InDesign, and I’m hoping that this article will prevent you from suffering as long and as hard as I did.
Typesetting built-up mathematical equations
Below is a math expression that includes several elements that you’ll need to master. You’ll find this same expression on page 141 of Book Design Made Simple. We’ll go through the equation several times, taking easy steps toward the desired final result:
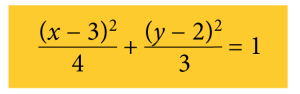
As with most of the examples in Book Design Made Simple, the type is set in 11/14 Minion Regular (enlarged here for visibility).
First, to make it obvious how this is going to work, here is the equation again, but this time everything that’s on the first line of type is purple and everything on the second line is green. Note that the numerators (upper line) are purple, and the operation sign (+), relation sign (=), and the 1 are also in purple. Only the denominators (lower line) are green.

Planning for alignment and tabs
Before you start setting your own equation, stop and figure out what kind of alignment you want to use for all of your math. Left justification is easiest because you’ll probably need to use some tabs, and tabs don’t work properly with centered type. If you have only a few equations and they are not stacked directly below each other, you can make them appear centered by using Left justification with a large left indent. You also must think what to do when there is a math expression with turnover lines. In most cases, the lines of math should align on the equal signs, which are stacked neatly below each other on the left. (Use tabs to make perfect alignments.) In the steps below, I’m going to ignore the alignment because your settings will vary.
Now let’s begin
So here goes. First, set the numbers on their respective lines, like this:
 Remember to:
- use superscripts where needed
- use italics for the variables (letters) but not for the parentheses
- set a space before and after each operation symbol
- use a real minus sign, which you’ll find in your Glyphs panel in the Math Symbols category. (If your font doesn’t have a minus sign, use an en dash instead.)
- set underlines where they are needed to act as horizontal bars. You can raise or lower the underline in the Character panel (Underline Options).
You’ll notice that I set a tab before both numbers in the denominator. We’ll use them in the next step.
Set your tabs to center the denominators under the horizontal bars. Go to Type>Tabs or type Ctrl/Cmd+Shift+T to see the Tabs panel. Click on the center tab symbol (second from left), click in the white area above the inch marks, and slide the arrow left and right—you can do this by eye—until the denominator looks centered under the bar. Repeat for the other denominator. Here are the settings I used:
 And here is the result:

Now you’re really making progress. The final steps are to set a baseline shift for the numerators and denominators. We will leave the plus sign and “= 1” on the main baseline. The baseline shift settings are shown below, with the numerators on the left and the denominators on the right. Select the left numerator, go to the baseline shift area in the Control panel, and type “6” in the field. Repeat with the right numerator. Then select the entire second line of the equation and type “8” in the baseline shift field.

At this point, you should have the equation set up properly. Notice that the entire thing is still on the baseline grid (assuming you’re using a grid—see page 138 of Book Design Made Simple)—even though it doesn’t appear so.
Remember to set up character styles for the parts of the equation. First select a section of the numerator, go to the Character Styles panel and then to New Character Style. Name the roman type in the numerator “num” (or something similar), italics in the numerator “numital,” and the superscripts “numsuper.” Check the settings to make sure that the underline is included, and the baseline shift is correct. Repeat this process with the denominator, naming the style “denom” (or something similar), and so on. Even if you only set one equation in your entire book, you need the character styles so the equation will show up properly in your ebook.
Add space above and below your equation—a full line of space will do. For your ebook, you’d better make a paragraph style specifying the space below (for the type above the equation—call it “tx-spbelow” if you like), and another style that includes the space above (for the type below the equation—”tx-spabove”).
Congratulations! You did it. This was even kind of fun, right? Now, with a little ingenuity, you can go on and typeset your own math right in InDesign.
Typesetting math symbols
Check your Glyphs panel to see what kind of math symbols are included with your font before you plunge in. Minion has lots of symbols, and many other typefaces meant for text (as opposed to display) will have the same. If your font doesn’t have all the symbols you need, try using Minion glyphs for the symbols, and then make life easier by setting up a “sym” Character style for them.
If you need to use the ∫ (function) symbol, you can stretch it vertically using the Vertical Scale area on the Control panel. Set up a character style for the stretched symbol.
If you need to show a square root, here are the steps. First, set the √ symbol and some numbers, then give the numbers an underline.

So far it looks all wrong, but don’t worry.
Next, select the numerals, go to the Character panel, select Underline Options, and set the Offset at –11. This will raise the underline above the numbers and more or less align it with the top of the square root symbol:
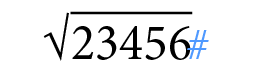
Set up a character style for the numbers under the bar, calling it “sqroot,” for instance, and be sure to include the Underline Options.
Excellent! Now you’ve got enough experience to figure out almost any kind of complicated typesetting, and you won’t have to worry that the symbols, bars, numerators, and denominators will slip out of place when displayed in print or an ebook.
If you have really complicated math, first look in the Chicago Manual of Style for guidance; there is a large section devoted to math typesetting in there. Also, you might consider buying a math plug-in for InDesign. See the Resources page on this site for suggestions.
We wish you the best in your endeavors. Please send us samples of your work and let us know if you discover any new tricks along the way.
Book Design Made Simple. You can do it yourself.


You might as well learn \LaTeX! If you want to write a document containing any scientific material, you might as well bite the bullet and learn \LaTeX! It’s free, open source, and you don’t need proprietary software to create/collaborate/share.
Thank you, Ron. LaTeX looks very interesting. Do you know if the math and formulas that it produces are compatible with InDesign? Or would we typeset them in LaTex and then insert the math as art?
Glenna
If you’re typing multiple math equations it would cut out a lot of time just to purchase the MathType program. It is extremely easy to use.
Thank you for that suggestion, KG. After a bit of research I figured out that the equations can be made in Word or some other program using the MathType plugin and then imported into InDesign as eps files (graphics). This could work well. Either way, setting up math in a book is a bit of a chore.
Glenna
I had spent about 3-4 hours trying to figure this out… Thanks for a job well done. I’m currently working on a personal project in InDesign.
Thanks again.
Hello David,
We’re very glad we could help! Good luck with your project.
Glenna
This article describes exactly how I learned to set equations on the job, and I have never seen it written down anywhere!
Hi Cecile,
It took a lot of fiddling around to figure out how to do this the first time, right? And that’s why we wrote this book! Thanks for reading and approving!
Glenna