 Want to improve your tables in InDesign? So far you’ve imported your table or spreadsheet from Word or Excel into InDesign, and made a few adjustments to the text and columns following our previous blog post, Want to import from Excel into InDesign? Your table probably looks okay (i.e., readable), but does it rock your world? Not so much.
There are lots of ways to make tables look good in InDesign. In this blog post, we’ll take you through the steps to create a simple yet attractive greyscale or color table. We’ll start by explaining InDesign’s cell and table styles, as they provide an easy way to make all the tables in your book consistent.
Cell styles 101
Cell styles specify the amount of space around the text in a cell, and also which paragraph style is used within that cell. A simple table might have just two cell styles, one for the cells in the header row and one for all the other cells.
Take a moment now to set up two cell styles for your table: a Header cell style and a Text cell style. First open your Cell Styles panel by choosing Window>Styles>Cell Styles. Using the Type Tool, click in one of the cells in your header row to put your cursor there. Create a new cell style by clicking the fly-out menu in your Cell Styles panel and choosing New Cell Style. In the Style Name box at the top, name your style Header, and in the Paragraph Style drop-down box, choose the paragraph style you’ve created for your header row. (If you set up your table based on our previous blog post, your paragraph style for column heads will be called tch.) Then click OK.

 Now apply the Header cell style to your header row by selecting the whole row with your Type Tool (hover at the left of the row to show the black arrow, then click to select the whole row), then select Header in your Cell Styles panel to apply the cell style. Done.
Next repeat the steps above to create a new cell style for the regular text cells in your table. Using the Type Tool, click in one of the cells in your table to put your cursor there. Create a new cell style by clicking the fly-out menu in your Cell Styles panel and choosing New Cell Style. In the Style Name box at the top, name your style Text, and in the Paragraph Style drop-down box, choose the paragraph style you’ve created for your table text. (If you set up your table based on our previous blog post, your paragraph style for column heads will be called tb.) Then click OK.

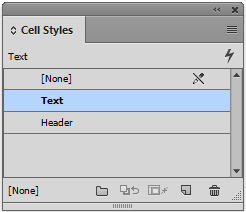 Now apply the Text cell style to all the rows below your header row by selecting them with your Type Tool (hover at the left of the uppermost row to show the black arrow, then click and drag down to the bottom of the table to select all the remaining rows), then select Text in your Cell Styles panel to apply the cell style. Done.
As you design your table, you may need to create another cell style or two, but you can cross that bridge when you come to it. If a particular column needs to be right-aligned or centered, you’ll create a new cell style for those particular cells and apply it. But you’re off to a good start.
Table styles 101
Table styles specify the overall look of your table, including its border, row and column strokes, and fills. To create a table style for your table, first open your Table Styles panel by choosing Window>Styles>Table Styles. Using the Type Tool, select your whole table by hovering at the top left corner of the table to see the diagonal black arrow, then click to select the table. Create a new table style by clicking the fly-out menu in your Table Styles panel and choosing New Table Style. In the Style Name box at the top, name your style (we’ve used Table 1 in this example). In the Cell Styles area at the bottom of the dialog box, choose Header for your Header Rows cell style, and Text for all the other rows. Then click OK.

 Now apply the new table style to your table by selecting the whole table with your Type Tool as explained above, then select Table 1 in your Table Styles panel to apply the table style. Done.
Next we’ll walk you through creating a simple grayscale or color table using the example from our previous blog post as a starting point.
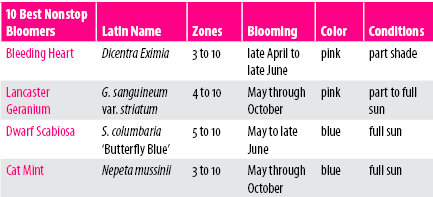
A simple grayscale table
This table looks nice in grayscale and makes a change from the traditional boxes-around-each-cell format:

Here’s how to adjust your table style to get this look:
Start by adding a dark gray fill to your header row. Open your Header cell style by double-clicking it in your Cell Styles panel, then choose Strokes and Fills on the left. In the Cell Stroke area there is a diagram of a cell, probably showing all four sides in blue (the default). Note in the screenshot below that only the left and right sides of the cell are blue. Deselect the top and bottom of your cell by clicking on the blue lines (they’ll turn grey as shown below and will no longer be selected). Then fill in the rest of the dialog box as shown below. This means that the left and right sides of each cell are selected and they will have the 1 pt white stroke applied to them. At the bottom in the Cell Fill area, you’ll choose the background fill color for your header row. Then click OK.

Now open your Table style by double-clicking it in your Table Styles panel. You’ll use your Table style to control the fills and strokes for the rest of your table, choosing whether or not to include fills and strokes and, if so, what colors and thicknesses they’ll be.
In your Table Style Options dialog box, first choose Table Setup on the left. In the Table Border area, choose None from the Type drop-down menu to turn off any border around your table. All the other choices will be grayed out after you select None.
 Next choose Row Strokes on the left. This particular table does not use any row strokes, so you’ll need to turn them off. Choose Every Other Row from the Alternating Pattern drop-down menu, then choose None from both Type drop-down menus. Once you’ve done this, all the other choices will be grayed out.

Next choose Column Strokes on the left. This particular table does not use any column strokes, so you’ll need to turn them off. Choose Every Other Column from the Alternating Pattern drop-down menu, then choose None from both Type drop-down menus. Once you’ve done this, all the other choices will be grayed out.

Finally, choose Fills on the left. This table has alternating rows of gray, so choose Every Other Row from the Alternating Pattern drop-down menu. In the Alternating section, fill in the choices shown below. The First alternating row has a fill of 10% black, which means that regular text will be easy to read on top of this light grey background. The Next alternating row has no fill color. If the Preview box at the bottom left is checked, you’ll see the changes in your table, with the first row below your header row without color, and the second row with color, and so on. If you’d prefer that the first row below the header row have color instead, then change the number in the Skip First box to 1 Row. Click OK.

And now your table is done!
Adding color to your tables in InDesign
You may want to tweak your table a bit to polish it. We added some color to our table shown below: we changed the fill color of the header row to magenta (by choosing a different fill color in the Header cell style as shown above); we changed the text color in the header row to white (by changing the Character Color to Paper in our tch paragraph style); and we changed the text color in the left column to magenta (by creating a new character style called Magenta and applying it to that text).
So there are lots of choices for adding color to a table like this one, and yet it still looks nice and will print just fine in a book printed with black ink only. Experiment with color and text changes by changing your styles (paragraph, character, cell and table styles). And if you make a change you don’t like, simply undo it by pressing Ctrl/Cmd+Z.
3 blog posts to help you with tables in InDesign
We hope our set of three blog posts about setting up tables in InDesign will help you get started with your own tables.
Want to import from Excel into InDesign? explains:
- importing a spreadsheet from Excel into InDesign
- changing widths of columns to fit a book page
- adding a header row that repeats from page to page
- creating paragraph styles for columns heads and text
- aligning text within table cells
- copying and pasting a table into main narrative flow of text
This blog post explains:
- creating and applying cell styles for header and text rows
- creating and applying a table style
- setting up alternating row colors for a modern-looking table
- adding color to table cells and text
Adding images and numbers to tables in InDesign explains:
- adding a second header row to include a table title
- adding images to table cells
- aligning numbers in columns
- creating new cell styles for use in other tables
If you have any questions or comments, we’ll welcome your thoughts in the Comments below. Happy designing!
Read more: Using InDesign keyboard shortcuts » Speed up your workflow.
And more: Hyphenation and justification » Make your text look fabulous!
Book Design Made Simple. You can do it yourself.


Leave a Reply