 How can you determine whether an image file is high enough resolution to use in your book? That’s a question I get asked all the time! Images should be at least 300 ppi (pixels per inch) at the size they’ll be printed at— and that’s where most people need help. How do you figure out the size of an image, and whether or not it’s suitable for printing?
There are two ways to find out whether the resolution of an image is high enough to print at the size you want: using math and using Photoshop (I’ll explain both). But first, a brief explanation of resolution. Every digital image is made up of pixels (squares of color) and the size the image is viewed at determines its resolution. Yes, that’s right: The size your image is viewed at determines its resolution!
Using math to determine maximum printing size
Because images need to be printed at 300 ppi, there’s a quick and easy way to determine the maximum size that an image can be printed at: simply divide the number of pixels in the image by 300. Here’s an example: The image below is 600 by 300 pixels. 600 by 300 divided by 300 = 2 by 1, so the largest size this image can be printed at is 2″ by 1″. That’s not very big!

This image is 600 by 300 pixels in size. To use this image in a book, the largest size it could be printed at is 2″ by 1″. If it was used any larger, the resolution would drop below 300 ppi.
To find out how many pixels are in an image, select the image in Explorer (Windows) or Finder (Mac) and its dimensions will be displayed in pixels. You can then divide the number of pixels by 300 to see the maximum size the image can be used at for printing.
Using Photoshop to determine maximum printing size
Open your image in Photoshop and go to Image>Image Size. You’ll see something like this:

Look at the Width and Height figures. This particular image is approx. 10″ x 8″, but the resolution is only 96 ppi—and for printing it must be 300 ppi. To change the resolution to 300 ppi, uncheck the Resample box to lock the Width, Height, and Resolution, then change the Resolution to 300 ppi, like this:

Now you can see how big the image is for printing. In this example, the image (at print resolution) is only 3.4 x 2.5 inches.
Keep in mind: cropping and resampling
Crop Tool
What if you intend to crop an image (just use a portion of it)? You’ll need to work out the maximum size the cropped image can be printed at. You can either estimate the number of pixels in the cropped image, or actually crop the image in Photoshop the same way it’ll be cropped in your book, and then check its image size. To crop in Photoshop, choose the Crop Tool and adjust the handles to fit how the image will be cropped, like this:
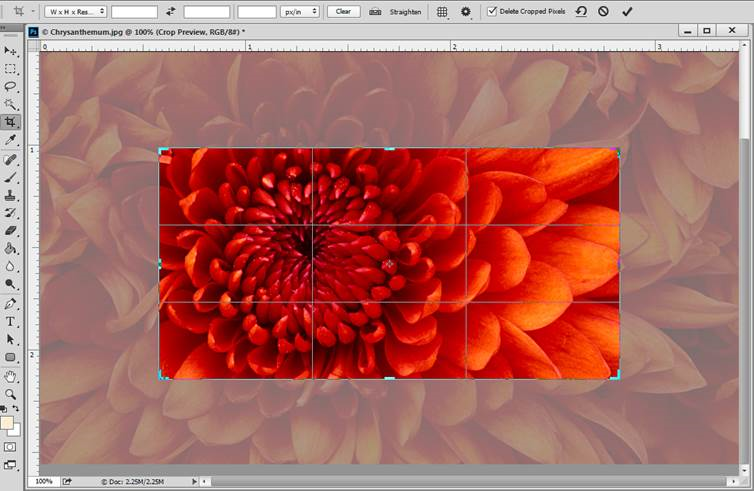
And then hit Enter/Return a couple of times. Now check the image size as described above to see its maximum size for printing.
If the resolution of your image is too low at the size the image will be used (i.e. under 300 ppi), then you can always try resampling the image (setting its resolution and size independently, resulting in some loss of quality). This, of course, is not your first choice, but the image may still be good enough to use after it’s resampled. (That’s a subject for another blog post! And it’s also explained in Book Design Made Simple—chapter 46.)
I hope this helps you to determine whether your image is high enough resolution to print in your book. If you have any questions, feel free to ask in the comments!
Read more: Preparing a screenshot for print » It’s trickier than you might think.
Read more: Converting multiple images to CMYK in Photoshop » Could save you time.
Book Design Made Simple. You can do it yourself.


Great article, the breakdown and demonstration really helped me to understand how it works through math but im still unfortunately confused and wonder if you can clear this up. I am attempting to upload designs for POD T shirts but am struggling immensely with exporting my file correctly (Using Adobe Illustrator). The POD requirements for one site give the pixel dimensions they want for the file to fit specific products, but they state that the PPI/DPI don’t have any effect BUT everywhere else makes sure to boldly state that 300 PPI is crucial for POD. The few other POD sites also say to make sure to have 300 PPI as well as certain dimensions but to export as a PNG. My problem is that i cannot export a file with the requested dimensions AS WELL as keeping 300 PPI as a PNG. I believe i read that you can only export a PNG at 72 PPI, if this is true then how do you achieve getting your file to consist of both requirements for POD? Hope i explained that well enough
Hi Gabriella,
I’m assuming you’re saving a file for Merch at Amazon, and having trouble saving a PNG at 300 ppi? Well, a quick online search shows that you’re not the only one! I’m not an expert in Illustrator and have never used Merch or PNG files for print, so don’t have a quick answer for you. One solution I found in the Adobe forum is to make sure you have the latest version of Illustrator, because that is supposed to fix this exact problem. Others suggest opening the file in Photoshop instead and saving it there, as Photoshop provides more options for saving PNG files than Illustrator. Or, you might try a help forum or helpline in Merch to ask that question?
I did find this blog post that explains how to size images in order to get 300 ppi PNG files, and hope that you find it helpful!
Fiona
Great article, however I’m still confused by the maths with working out the max size. Isn’t (600 x 300) / 300 = 600?
Hi Elena,
Sorry for the confusion. Each dimension of the image is divided by 300 separately, so you won’t multiply the two dimensions first. If your image is 600 x 300, first divide the 600 dimension by 300 (equals 2). Then divide the 300 dimension by 300 (equals 1). Then you’ll know that your 600 x 300 image can be printed at a size of 2″ x 1″. Now that you mention it, I see that using the multiplication symbol to describe the dimensions (600 x 300) is confusing when we’re discussing math, so I’ll edit it to read 600 by 300. Thanks for your question!
Fiona
Wow! Some fantastic tips here for publishing. I’m putting together my first coffee table book packed with poetry, photography and wisdom. I was looking for some fantastic tips and advice. This website is a little gem. Thanks for all great advice. I will be returning for more help.
Thanks for your kind words!
I’m trying to photograph some of my art and sell prints. I also dabble in photography and use photoshop and lightroom, but I admittedly don’t know as much about this as I should This was extraordinarily helpful. I shoot in RAW and could not understand why I was getting quality issues. Thanks for solving this piece of the puzzle.
Glad you found this helpful, Andrea! Good luck with your photography prints.
Glenna, I’m preparing to self-publish my book that contains numerous grayscale and color photos and illustrations, and museums have sent me very large files with 600-1200 dpi files at large sizes. Is there any benefit to using 600dpi images in my Indesign file? My printer company claims their printers have a maximum print resolution of 600 dpi, but will the human eye detect the difference between 300dpi and 600dpi images? I can’t seem to find an answer to this question online and there are many different opinions about the subject of dpi. Thanks for your help!
Hello Beth,
Fiona and I agree that you do not need the large files and the resolution higher than 300. Unless your printer is using extremely fancy and expensive equipment (and charging you for it), the images are probably going to come out at 300 ppi anyway. Only a person with amazing eyesight and/or a magnifying glass could tell the difference. So we advise that you resample the images in Photoshop, using the actual final dimensions on the page and 300 ppi.
We wish you the best with your book!
Glenna
Hi Glenna! Thank you so much for your post. I was wondering — what if the original image already has some compression artifacts? The image that the client wants me to use passes the resolution test stated in your post, but the picture looks like it has already gone through lossy compression (it is slightly pixelated). Will changing/resizing the resolution from 96 to 300 in Photoshop help reduce the artifacts?
Hello Jim,
It’s too bad that the client has handed you a photo with this problem. The first thing I’d try is to ask for the original photo. If that doesn’t work, check our article about preparing a screen shot for print because it shows how to fix some of the problems your image might have. Basically we suggest resampling to an enormous size, improving the image, then resampling back to the correct size. I hope that helps. If you find a different solution that works, let us know!
Glenna
You mention that the effective ppi should be 300. In my links panel, it shows two numbers for the effective psi (e.g. 305 x 481. Should I just be concerned with the first number or is also critical for the second number to be 300 also?
Hello Tom,
The reason you have 2 different numbers in the effective ppi listing is that the image is no longer in its the original proportions. It has been stretched horizontally. Perhaps that’s fine with you–it doesn’t really matter. As long as both numbers are above 299, you are all set for printing.
If you want to get your image back to its original proportions, you can do it in the Control panel. You’ll see that the 2 values in the horizontal and vertical percentage fields are different. (These numbers represent the percentage of the image’s original size.) First use the direct selection tool to select the image–you should get open anchor points in the corners of the bounding box. Then make sure that the little chain link in the Control panel is closed (click on it to toggle it). Next type in any number in one of the percentage fields, and your image should automatically go back to its original proportions. From there you can resize or crop or whatever you need to do.
I hope this helps. Good luck with your project.
Glenna