 What exactly is an InDesign book template? It’s a blank InDesign document that has all the background work done for you. When you open a template, you’ll see an untitled document that’s already set up with InDesign preferences, trim size, margins, and styles.
Our InDesign book template is a companion to Book Design Made Simple, the only book that guides you through every step of designing your own book using Adobe InDesign. We believe that anyone can learn to craft a well designed book, and now we’ve created an InDesign book template to get you started more quickly.
In this article, we’ll explain not only how our InDesign book template works, but also how you can create your own template and customize it to suit your needs:
- InDesign book template works perfectly with Book Design Made Simple
- What does the template include?
- What will my book look like?
- How to use the template
- Use the template as many times as you like
- Want to create your own template?
- Tips to customize your template
- Enjoy the convenience of an InDesign book template!
![]()
InDesign book template works perfectly with book
In Book Design Made Simple, we take you on a step-by-step journey from installing Adobe InDesign, setting up book pages, importing your manuscript, laying out your pages, adding images, designing your cover, and producing PDFs that are formatted perfectly for printing. In the process, you’ll progress from beginner to an experienced user who understands the InDesign program—plus what you’re doing and why.
And now we’ve created an InDesign book template that corresponds exactly to the book. It can save you a lot of time and let you start on the more creative aspects of book production sooner.
Book Design Made Simple and the InDesign book template work perfectly together. And you can use the template as many times as you want, and for as many book projects as you want.
Can you use the template without the book? Yes! If you already know how to use InDesign but perhaps have little book design experience, our template will make sense to you without the aid of the book.
Book Design Made Simple now offers an #InDesign book template for its readers. #bookdesign #selfpublishing https://tinyurl.com/4379kwrk Share on X![]()
What does the template include?

Each style name includes the page number that it came from in the book.
The InDesign book template includes all the paragraph and character styles for the basic design set out in Book Design Made Simple. To produce the template, we started on page 29 and followed our own instructions for InDesign preferences, book trim size, and margins. Next, we set up all 48 of the foundational paragraph and character styles that we describe in the book. And then we stopped.
After that point, all the styles that we offer in the book are optional—you’ll use whichever options best suit the design you envision for your book. But all the optional styles are based on the foundational styles that are included in the template.
Here is a list of some of the paragraph styles included in the template:
- Captions
- Chapter Numbers
- Chapter Titles
- Extracts
- Folios (page numbers)
- FRONT MATTER
- Copyright
- Dedication
- Epigraph
- Headings, Levels 1, 2, and 3
- INDEX
- Index Headings
- Index Entries, Levels 1, 2, and 3
- LISTS
- Numbered Lists, 1 and 2 digits
- Bulleted Lists
- Multi-column Lists
- Unnumbered Lists
- Opening Quotes
- Quote Attributions
- Paragraph Separators
- Running Feet
- Running Heads
- Sidebars, Title
- Sidebars, Text
- Text
- Text, No Indent
- Text, Space After
As you can see, we’ve created a style for pretty much anything you’ll need for designing and typesetting the pages of your book.
Download the template now for a one-time cost of $19.95 USD.
Use it as many times as you like (no subscription required)!

What will my book look like?
Usually when you invest in an InDesign book template, you are offered one single design. But this template is different. If you stick with the styles that are in the template now, your chapter opener (for example) will look like this:
 But once you move along in Book Design Made Simple, you’ll see eleven other chapter opener design possibilities, all of which are based directly on the styles in the template. (You’ll see in the next section how you’re shown to make the changes.) Here are nine of those design suggestions offered in the book:

Similarly, you’re offered design variations for part openers, headings, tables of contents, running heads and feet, glossaries, endnotes, and bibliographies, and more. The result is a custom designed book—that’s based on a template.
![]()
How to use the InDesign book template
When you open the template, your first step will be to give the file a name. Then, you might choose to change the page dimensions and margins to suit your own project, if required. (We explain how in the book.) You may also want to experiment with different typefaces and sizes, and that’s great. Book Design Made Simple shows you how to customize everything.
(If you prefer to watch the whole process, we’ve created a video just for you!)
In the book, you’ll find several different design options for your chapter and part opening pages. Each design option explains how to build that design from the basic paragraph styles that are included in the template.
Shown below are instructions from the book on how to adjust your Chapter Titles and Opening Quotes paragraph styles from the basic styles included in the template, to achieve our “Design 6: Modern chapter opening.” You simply open the styles included in the template, and make the changes noted.

Instructions for each style variation refer back to the page that defines the relevant basic style that’s included in the template.
![]()
Use the template as many times as you like
We believe that anyone who’s following our step-by-step instructions will get a big boost from our companion InDesign book template. The InDesign template (.indt) file will work with any version of InDesign. Simply open the file and you’ll be on your way immediately.
And remember, you can use the template as many times as you like. No license or subscription is required.
Download the template now for a one-time cost of $19.95 USD.
Use it as many times as you like (no subscription required)!
Here’s what page 1 of the template looks like (below). If you’ve used InDesign before, it should seem very familiar. After you read this welcome note on the left, the rest is up to you.

![]()
Want to create your own template?
Let’s say you’ve used the Book Design Made Simple template to complete a book. Wonderful! And now you’ve got an InDesign file that works just right for you, with customized text styles, and possibly some object styles and parent (master) pages. So what should you do? You should save it as a template!
Believe it or not, it’s easy to create a template. If you’ll have future projects that will resemble your current book (for example, if you’re designing a book series), you can simply save your current file as an InDesign template, and bingo! You’re ready to start your next book with a clean template to work from.
Here’s how to do it: Click File > Save As to get the Save As dialog box. Add a name for your template in the File Name box at the bottom, and select InDesign template from the Save As Type drop-down menu.

Add a name for your template and select “template” as your file type. Note the file extension now shows as .indt (InDesign Template) instead of the usual .indd (InDesign Document).
You’ll be able to use your .indt file as many times as you want. Each time you open the template it will be an untitled InDesign (.indd) file.
![]()
Tips to customize your template
Now that you’ve saved your document as an InDesign template, you can customize it for easy future use. We work from templates all the time, and these tips will really help to de-clutter your template, keep your file size down, and streamline your workflow:
Removing unused styles
Your template will probably have lots of styles that you didn’t end up using in your book—paragraph styles, character styles, object styles, and even color swatches. Here’s how to remove them:
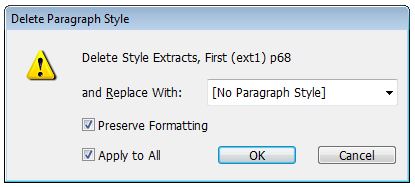 Remove unused paragraph styles. Click the fly-out menu at the top right of your Paragraph Styles panel, then choose Select All Unused to highlight the unused styles. Click the Trash at the bottom right to get the Delete Paragraph Style dialog box shown here, then click OK to delete all unused paragraph styles. You’ll see that the three folders remain (FRONT MATTER, INDEX, and LISTS). If any of them are empty, select and delete those too. Important: When you’re finished, be sure to select your Basic Paragraph style to make it your default paragraph style for placing text in the future.
Remove unused character styles.Repeat the same steps for your character styles. Important: When you’re finished, be sure to select [None] to make it your default character style for placing text in the future.
Remove unused color swatches. Repeat the same steps for your color swatches.
Setting up keyboard shortcuts
The next time you use your template, you’ll probably be applying certain styles (tx, tx1, h1, etc.) dozens of times in the course of an hour. You select text, then you go to your Paragraph or Character Styles panel, find the style you want to use, and click on it with your mouse or on your trackpad. Forget that! You can work more efficiently with keyboard shortcuts. Read our article about using InDesign keyboard shortcuts to get you going.
Strip out copy and images
Lastly, you’ll want to delete all the existing text and images in your template to make room for your next book. We like to do this in two steps: deleting all pages except the first three, and then deleting the remaining text and image frames from those three pages.
Deleting the pages. First, go into your Preferences panel (Windows: Edit > Preferences, Mac: InDesign > Preferences), and choose the Type tab on the left. Uncheck the Smart Text Reflow box, and click OK at the bottom.

In your Pages panel, select page 4, then scroll down to the last page. Press Shift and click on the last page to select ALL the pages between. Then click Trash. You’ll see the dialog box shown here, and click OK.
Deleting remaining text and image frames. Using your Selection tool, click and drag across the whole page to select all the frames, and press Delete. Repeat this on each of the three remaining pages. Voilà!
Turn Smart Text Reflow back on. Don’t forget this step! Go back into Preferences > Type and check the Smart Text Reflow box to turn it back on. Click OK.
Now you have a lean, clean, ready-to-go InDesign book template for your next book! AND you’ll work faster next time.
Download the template now for a one-time cost of $19.95 USD.
Use it as many times as you like (no subscription required)!
![]()
Enjoy the convenience of an InDesign book template!
Our InDesign book template saves you time and allows you to move on quickly toward implementing your own ideas. Feel free to send us your comments and questions about the template.
We wish you the best possible design result for your book!
Watch the video: InDesign book template »
Read more: Learn how to design your own book»
And more: Your copyright page » everything you need to know (including a template!)
Visit our SHOP to purchase Book Design Made Simple and/or InDesign Book Template »
Book Design Made Simple. You can do it yourself.


I just read the book. I saw how much better I could do things, and I have decided to redo a 13 document InDesign book. I have a problem with remembering all the epub codes. Perhaps, in your next addition you could 1) provide a tip to use a construction like “Chapter number (cn)” for style names, and 2) provide a cheat sheet of all those codes and what they mean.
Hello John,
If you were to follow the instructions in the early chapters on how to construct your own set of style sheets, you could name all the styles any way that you can easily remember. Or you could purchase our template and save yourself a lot of time and get the same result. Also, once you make your paragraph styles, you can scramble the style names in the Paragraph Styles list in any way you like: alphabetically, or in logical groups.
If you’re a subscriber to our blog, you’ll know by now that Book Design Made Simple is closing at the end of 2026, and none of our products will be available anymore. So this is a little warning for you, in case you’re interested.
Best of luck redoing your book. We’re glad to hear that you’ll be able to work more efficiently now.
Glenna
Recently bought the template after having used the book previously. Just published a novel in paperback and hardcover using the template and customizing it. Paperback is 5.5 x 8.5. Hardcover is 6 x 9. Easily set margins to meet KDP guidelines. Used Jenson for body, slightly larger for hardcover. Overall very easy to use and customize.
Thank you for your comments on the template, Hal. And by the way, Jenson is one of my favorite text typefaces. I’m sure your next book is going to look as great as your first.
Glenna
Thanks for the super helpful site / content. Do you have / sell a base coffee table book template that I could buy and modify? I appreciate that I could modify the template that you already have for sale into a coffee table, book format, however, I’m worried about the number of modifications I would need to make, and potentially making an error (or two or ten). Thanks again!
Hi Ben,
We didn’t create a separate template for coffee table books because they come in so many different shapes, sizes, and layouts that we surely couldn’t please everyone. So instead we created the same template that you’ll create yourself when you follow the steps in Book Design Made Simple. To design a coffee table book starting with our template, you’ll need to change the trim size, the margins, and come up with a good, usable type area and overall design. If you have a copy of Book Design Made Simple (the ebook and ePDF versions are the least expensive), you’ll be able to handle all of that without any problems.
We wrote a blog post about designing a coffee table book, and we made a video about how to use columns to come up with a nice, neat page layout (and here is a book excerpt on the same topic).
The book design template will give you a great starting point because it already has all the best typography settings all done for you. Those settings are also laid out in the book, though, so the template will just give you a head start on setting up your document.
Either way, we think you’d do fine by following the meticulous steps we provide in Book Design Made Simple.
We hope this helps, and please do ask if you have more questions.
Fiona and Glenna
Good day ladies, I am writing my 3rd book now and using Scrivener. I plan to publish again through IngramSpark. Your book begins with the chapter; “From Word to Indesign”. As a Mac User since 1989 and a professional IT support person (retired), it is safe to say (and army wife can testify) “I HATE MICROSOFT”. So how easy is it to get my book from Pages and or Scrivener into your Indesign tutorials and lessons within your otherwise fine and useful publication. Thank You.
PS: my website is acting strange lately, but will be running at full capacity very soon.
Hi Jon,
I did an experiment going from Pages to InDesign. Three methods worked, but as you’ve probably discovered, you cannot import Pages text directly into InDesign. I tried plain text, rich text format (RTF), and Word. By far the best result came from using the RTF format. You can still get import options, as described in chapter 8 of our book, and they seem to work. So in Pages, go to File > Export, and choose RTF.
Looking online, I found similar instructions for importing Scrivener text into InDesign by exporting as RTF.
Give this method a try, and I hope it gives you confidence to continue on in either Pages or Scrivener. Let us know how it goes. Best of luck with your project.
Glenna
Glenna,
Thanks so much for checking this out for me. I have just spent the evening dumping an old Scrivener file into Word. While I wait for InDesign to download (been a Creative Cloud member for years now), I checked in to your website and found your most positive response. I will export to RTF ASAP and as soon as my InDesign is working and I can get ahold of your template, will be experimenting with that process. Thanks again and hope to be in touch again soon.
It’s like those of us who do not have paypal are cut off from securing such a helpful product after watching the video. Glenna and Fiona, something has to be done.
Hi Akwasi,
We’re able to receive payment by credit card via Square. You can email us at info@bookdesignmadesimple.com to request the link. Please note that when paying via Square you will not be able to automatically download the template when your payment is complete. As soon as we receive notification of your payment, we’ll send you the template via email.
We hope this helps you and anyone else who is unable to access PayPal.
Fiona
I am interested in getting the InDesign template but pay pal is the only system of payment which is not available in my country Ghana. Please, is there another way of payment for the template?
Dipping my toes in the water! So tentative. So hesitant. Thank you for Book Design Made Simple.
Anjali Amit
Hi Anjali,
We love all InDesign beginners, and anyone who’s just dipping toes in the water! As we always say, you can do it yourself. And we like to help when we can.
With all best encouragement from
Glenna and Fiona