 Crop marks and other printer’s marks appear in the PDFs you send to the printer. In Book Design Made Simple, we mention crop marks exactly once and never define what they are, so we think it’s about time that we did so.
Simply put, crop marks are chop marks—they indicate where the printer will chop around the edges of the stack of printed pages to make them the correct size, and a nice, neat package for binding.
Whether you’ve been using InDesign or some other graphic design software, you’ll finally get to the point when it’s time to set up your PDF to send to the printer. To start, go to File > Export. First, choose the Adobe PDF for print setting (shown below). (All of our examples are from InDesign, but in other applications the options are pretty much the same.)
This takes you to the dialog box that shows all your choices. You’ll be following your printer’s directions at this point. (On the top couple of lines, circled in red, your entries may very well be different, depending on your instructions.) When you click on the Marks and Bleeds tab, you’ll see the following:
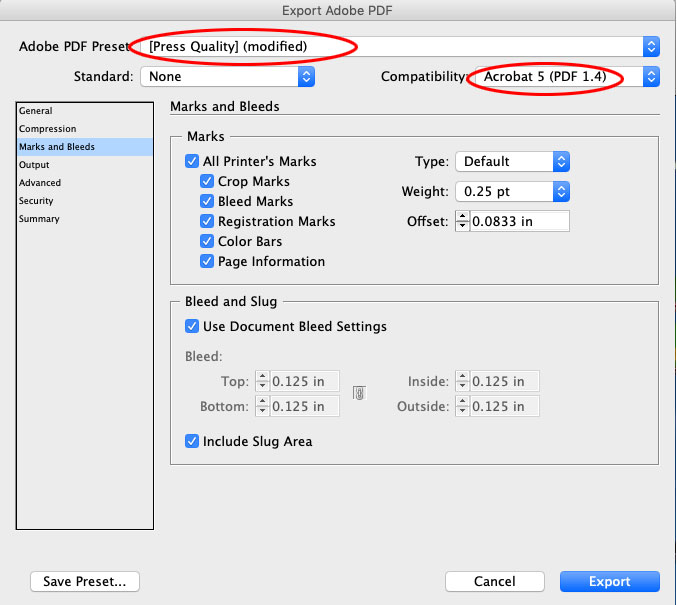
Your Adobe PDF Preset and Compatibility settings will most likely be different from the ones shown.
If you select All Printer’s Marks, every Marks option shown above will be checked automatically. We’ll explain each printer’s mark for you even though your printer may not want you to use them all.
But first, let’s look at the Bleed and Slug section.
Bleed and Slug
Bleed
When you originally set up your document, you may have indicated a bleed amount. A bleed is ink that appears to run up to the edge of a page—but in actuality, it runs right over the edge a certain amount (normally 1/8″ or 0.125 inches).
When setting up your PDF, you’ll simply select Use Document Bleed Settings and the fields will fill in automatically. Check to be sure they are the same values that your printer specifies.
Note that many books, such as novels, have no ink at the edges of the pages, and thus no bleed at all. In that case, the Bleed fields will all be zero.
Slug Area
What the heck is the slug area? It’s simply the space around the edge of the PDF pages or spreads that shows the printer’s marks—crop marks, bleed marks, registration marks, etc. In most cases, you do want to show the slug area.
Crop Marks
Books are always printed on paper that’s oversized. (And yes, there’s a good amount of waste, but as you read along, you’ll understand why.) And so, as we explained in the intro, the crop marks are guidelines that show where the printer is going to chop with a big guillotine around the outside of the stacked, printed pages to make them the correct size, and to give the book a neat outer edge. If you have a bleed, this is when it’s cropped off.
Once you specify the crop marks and then view the PDF, you’ll see crop marks at the outside corners of each page or spread:

The image above is going to appear in the upper right corner of a book page. It will be cut off where the crop marks are.
The printer always requires single-page PDFs, but if you decide to make one of two-page spreads for your own viewing, you’ll notice another mark at the center top of the spread showing the dividing line between the pages. (The printer would either cut or fold there. We explain the reason for this in our article on book binding basics.) And read on for more.
Okay now, hang in there because here comes the possibly confusing bit. Let’s say you place an image across a spread, as shown in InDesign below.
 So what do you think is going to happen when you make single-page PDFs of these two InDesign pages? Look at the inside upper corners of the two PDF pages below. See how the left page has a bit of the image from the right page, and vice versa? (The green and yellow flag appears twice.) But also notice that the repeated bits are outside the crop marks. This is completely normal and there’s no reason to worry when you see it.

By the way, we hope you’d never place an image like this in the center of a spread! It works to illustrate our point here, but if printed in a book, the yellow tower would disappear into the gutter between pages.
Now let’s continue with the crop mark settings. In the right column of the dialog box, you see three options for the crop marks and bleed marks: Type, Weight, and Offset. Here’s what they mean:
Type
This refers to the kind of crop marks to use; in Japan, for instance, they look different. Stick with the Default option here unless you hear otherwise from your printer.
Weight

The offset is the distance from the crop mark to the actual crop line (red dashes).
The weight option describes the thickness of the crop mark lines. 0.25 pt weight is perfect.
Offset
The offset is illustrated to the right. The given amount of 0.0833 inches is fine.
Bleed Marks
Bleed marks simply show the outer edge of the bleed area. So when you see two sets of marks (as below), the outer ones are the bleed marks.
Registration Marks
Registration marks are very useful to the printer and pretty cool once you understand them. You already know that full-color printing requires four ink colors: cyan, magenta, yellow, and black (CMYK). Before a color page can be printed, the printer separates it into four separate pieces of film—one for each color—with a registration mark for each color. Then the press applies the inks one after the other, and the aim is to get each color in precisely the right locations so that the printing looks nice and neat. We’ve all seen instances of ink that’s out of register, and it looks unfocused and just wrong.
So when a book is being printed, the press person constantly watches the registration marks as the pages come off the press to make sure that all the colors are lining up perfectly on the little target marks above and below every page.

When inks are lined up precisely (in register), the 4 marks, all printed on top of each other, look like the one on the left. If not, they look something like the one on the right.
Color Bars
A color bar is a row of samples of black at various tints (percentages) and the CMYK colors. The printer can examine each sample to see if too much or too little ink is being put on the page. A careful press person will keep a close eye on the little samples to make sure they look correct.
 Page Information

The page information simply shows your PDF file name, the page number (14 in this case), and the current date and time at the bottom of each page.

Now that you understand crop marks and the other printer’s marks, you should feel more confident and knowledgeable as you prepare your PDFs for printing.
Read more: Book binding types » Choose the very best binding style for your book.
And more: Book printers for indie authors » Our list of reliable book printers
And even more: How to choose the right trim size » Trim size is part of your marketing and your message, too.
Book Design Made Simple. You can do it yourself.


Chop marks are signatures used in lithography and other fine arts printmaking. Each print shop has its own and each individual printer who is working with an artist may also have one. They are not crop marks. These terms are not interchangeable.
Ah yes, well, I think in this case we used “chop” simply to indicate what “crop” means. After that one explanation we did not repeat “chop marks.” I hope it’s clear to (almost) everyone. Thanks for your close attention, Jeaneane.
Glenna